Tuesday, April 6, 2010

Tutorial Tuesday: Upcycled Magazine Holder

When I started setting up my craft corner, I decided right off the bat that I was going to make organization a priority.  Mostly so I could spend less looking for things and more time making things, but also because I just really enjoy organizing things.  Of course, putting everything in its place meant that... well, it needed a place.  I bought a couple of little plastic containers at the dollar store, added on to my sophisticated shoebox system, tucked some stuff in the latest box from Amazon...  I even borrowed some baking cups from the kitchen to hold my paperclips and pushpins.  I'm very fond of repurposing things for storage. 

So when we came across a blurb in an issue of Better Homes and Gardens that suggested making magazine holders out of cereal boxes, I knew I was going to have to try it.  But whereas they left the boxes undecorated aside from a label on the side, I decided to kick things up a notch and cover mine with wrapping paper. 

 Here's what I wound up with:


Have I not mentioned my mild obsession with  fondness for Hello Kitty before? 

Anyway... This was all well and good for holding my magazines, but what I still had a whole stack of folders full of patterns and tutorials and such.  I had some more cereal boxes, but alas, none of them was quite wide enough to accommodate the folders.  But we happened to have another box lying around that was just the right size, so I decided to just adapt the method to make a slightly bigger box.  And while I was at it, I figured I'd document the process and write up a tutorial for all my dear bloggy friends.

So, enough rambling.  Let's get started, shall we?


Here's what you'll need:

  • A box of some sort.  Doesn't really matter what kind, so long as it's big enough to hold whatever you want to store in it.  
  • Scissors or utility knife, craft knife, x-acto, etc.  I used the utility knife because the cardboard was rather thick.  And also, I just suck and scissors.
  • Ruler 
  • Sharpie (or other writing utensil to mark your cutting lines on the box)
  • Tape
  • Wrapping paper (or whatever you wish to cover your box with; I just used wrapping paper because it was big enough that I could cover the box and only have one visible seam)
 Step 1: Remove Flaps


Using your preferred tool, cut the flaps off the top of your box.  If you're like me and you can't cut a straight line to save your life, don't worry.  Most of this top portion is going to get cut away later anyway. 

Step 2: Measure and Mark

 
Grab your ruler and sharpie and measure up 4.5" from the bottom of your box.  Make a mark at this point.  Then, measure 3" in from the other side and make a mark at the top of your box.  Now connect the dots.  This is the line you'll be cutting along later. 

But first, to make your life a little easier, flip your box over and repeat this process on the other side.  And, if you'd like, draw a line on the end connecting the two bottom points. 

Step 3: Cut

 
Cut along the lines you just marked using whatever tool your prefer.  I used my utility knife and ruler to get nice, straight lines, but scissors will get the job done too.

Step 4: Get Wrappin'


If you're familiar with gift wrapping, you can probably figure this out on you're own.  But just in case you're not, let's take this step by step...

First off, you're going to need a rather large, fairly flat surface. The floor is probably best, but I used the bed because it was there.  Roll out your wrapping paper and place your box near the edge.  Fold up the edge so that it partly covers the end of the box and tape it in place (I didn't do this, as you can see in the picture above, and I ran into a minor problem later--learn from my mistake).

Now, grab the roll of paper and bring it over the front of the box.  You need to get a general idea of where to cut your paper so that you'll have enough for the edges to overlap, so find that point and make a crease (or mark as you please), then cut your paper at that point. 

Tape the newly cut edge in place and your box should now have a nice, if somewhat oversized, paper belt.  Like so:


If you look closely at the right side, you'll notice there's a gap between the edges.  That's the issue I mentioned earlier.  I flubbed my guesstimating because I didn't tape the first edge to keep it from shifting.  If this happens to you, don't panic.  It's a pretty easy fix.  But we'll talk about that later.  On with the wrapping...

Next we're gonna deal with the bottom.  But first thing's first.  There is probably way more paper there than you're gonna need, so go ahead and trim it off.  Ideally you should have have about 3 inches or so to work with. 

Now comes the part that's tricky to explain...  You need to push in the sides, so that they're flat against the bottom of the box and a sort of triangular flap is formed, like so:


When you push the sides in, this is the way the paper will naturally want to fold, so just go with it.  Crease those folds and smooth things out. 

Now repeat the process to form a flap on the top.  Like this:
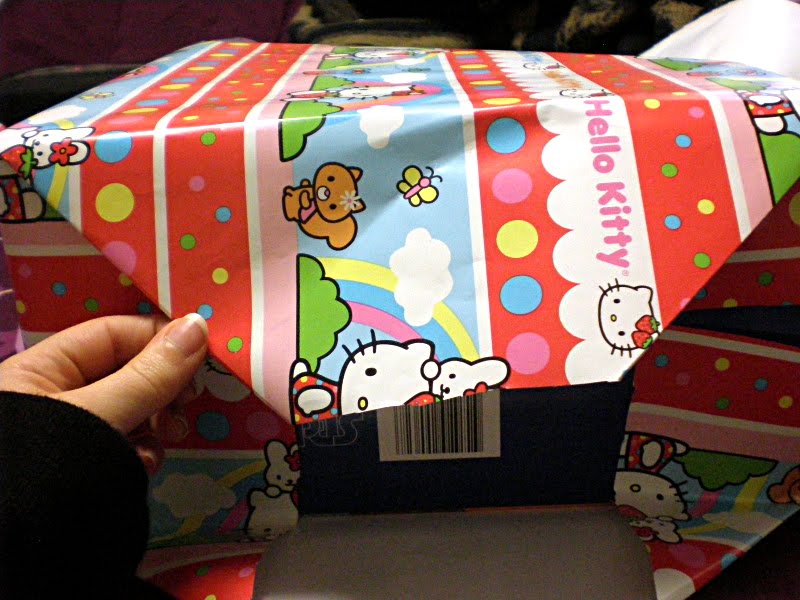

Now that you have your two flaps, you need to tape 'em down.  It doesn't really matter which way, but I personally find it easier to tape the bottom flap to the box first, and then folds down the top flap and tape it in place.  Either way, you want to make sure to pull the paper tight against the box, so it's wrapped nice and snug. 

And... voila!


Again, you'll notice the gap left from my earlier goof.  Not a big deal here, obviously, 'cuz it's on the bottom.

Pretty easy, huh?  Well, wrapping the rest of the box is even easier.  You'll wanna have your scissors handy, because you'll be doing a lot of trimming and cutting.

I started with the short end, but you can start wherever.  Basically, all you need to do is trim the section your working with down to a manageable size, locate the nearest corner, and cut straight down until you meet it, so you're left with a flap, like this:


Then just fold down the flap and tape it to the inside of the box.  Now work your way around the rest of the box in the same manner--cut straight down at the corners, fold over the flap, tape it to the inside.  Simple.  

You may notice at the corners, unless you're cutting is totally perfect, that the paper tears just a bit.  You can place a small piece of tape at the corners to neaten things up and give them a bit of reinforcement, if you wish, but it's not strictly necessary.

Once you're done with all your cutting and taping, you'll have something like this:


Of course, if you goofed like I did, you're not quite finished.  To cover the gap on the end, I just cut a piece of wrapping paper a wee bit bigger than the end and taped it in place...


It's taped on the inside, bottom, and right at the corners, so it's barely even noticeable.

And there you have it!  A simple, creative way to put those old boxes to good use and get things organized.  I hope you enjoyed this tutorial, and if you have any questions, just leave me a comment.  :)

Monday, April 5, 2010

Monday Motivator: Everything's Blooming!

I haven't been posting much lately, so you might think there's nothing interesting going on in my world. But that couldn't be farther from the truth. This spring, while everything outside is blooming, it seems like my creative/business life has blossomed as well.

For starters, I finally managed to snag a treasury Saturday. And *drum roll please* it made the front page last night! :D


And here the original Treasury.  Apparently the Etsy community likes tentacled critters just as much as I do.  This was such a pleasant surprise to discover.  Thanks to everyone who clicked and commented! 

In addition, I've seen a BIG increase in views lately.  And according to Google Analytics, I have Twitter to thank for that.  Specifically the World Wide Etsy Sellers group.  This awesome group of Tweeters has helped me in a number of ways, not just with all of their kind tweets and re-tweets.  They've also helped Twitter feel more like a community to me.  I've been a big fan of Twitter right from the start, but whenever I tweeted about my shop I felt kind of... spammy.  But the folks from WWES do all sorts of tweeting for me.  And when I do tweet about my shop, they re-tweet.  And I return the favor, and we all just spread the Twitter-love.  So if you're feelin' a little lonely out there in Twitter Land, stop by the blog, read the rules, leave a comment, and join the group!

And last but not least, I believe I mentioned in my last post that I was working on my new work area, which I have officially dubbed the Crafty Corner.  This rounds out the Trifecta of Inspirations.  I intend to devote a whole post to it once I've finished moving and organizing things, but in the meantime, I must say, I have a new favorite part of the house.  And I can hardly believe the difference that having this space has made already.  There's just something about establishing a dedicated space for your crafty work that just makes it feel so much more... professional.  I'd say "serious," but I can never be serious when I'm crafting.  It's too much fun!

So all of this together has combined to give me one big boost in confidence.  I'm getting some recognition now.  If my treasury made the front page, my items can to.  I can be a success, and I will be.  Because I'm never going to give up.

Tuesday, March 30, 2010

Featured EtsyBlogger: DizzyDragonflies

First off, let me apologize for being so scarce lately.  I'm afraid the blog's temporarily taken a backseat.  I've been super busy setting up my new work area/home office (yay!), trying to get it--and the rest of my life--organized, and doing some serious fiction writing (or at least plotting).  So, pardon my impromptu vacation.  I'll be back in full force soon!

In the meantime, let me introduce you to this month's featured EtsyBloggers team member, DizzyDragonflies!

Dizzy's specialty is hand-dyed yarn and knitted items. Let me show you some of the knitting before I get tangled up in the yarn...


Doesn't this look cozy? And pretty! I love the black and white and grays. Very classy. But if you prefer more color, check out Dizzy's shop. She has a couple of other beautiful scarves, and all just ten bucks! You know you're gonna want one next winter. Plan ahead! Snag one now!

Now, if you're a knitter/crocheter/yarn junkie, like myself, you're probably going to have a hard time getting to the bottom of the page without getting distracted by all that gorgeous hand-dyed yarn. In fact, I think I just felt a small breeze from the collective turning of heads. Careful, Knitters. You'll give yourselves whiplash.

Here. Let me show you a few of my favorites...


This vibrant beauty is called "Turn it Down a Notch," but I like it right where it is. I'm usually not fond of orange, but I have to admit it looks just beautiful here mixed in with those fiery reds. Like all of Dizzy's yarns, this one is 100% wool, so it's suitable for felting. And I think this one would look especially gorgeous that way.

Perfect Project for This Yarn: Felted bag. Or a long, fluttery scarf (makes me think of phoenix feathers).

Now, moving on to something a bit more demure...


"A Little Bad for the Girl" is the name of this one, and how appropriate. It's definitely girly with its pretty pink and soft gray. But something about the contrast is... well, a little bad. This is the girl that sneaks out of ballet class to have a smoke behind the studio.

Perfect Project for This Yarn: Fingerless gloves or armwarmers.

And last, but certainly not least:


This one is simply and evocatively entitled "Orchid" and was inspired by an actual orchid that Dizzy had blooming in her kitchen. Isn't that great? Dizzy's done such a wonderful job of capturing the colors here that I can just see that original orchid. In fact, I almost feel like this yarn ought to be used to make flowers, to bring it full circle.

Perfect Project for This Yarn: Aside from flowers, I think this would make a really lovely shawl or maybe a shrug. Something to wear in spring.

I could go on and on about these gorgeous yarns in all these beautiful colors, but my fingers would get tired eventually. So I shall stop here. Now off you go to look at the rest. Go on, now. Shoo!

Monday, March 22, 2010

Monday Motivator: Shopping!

A lot of our weekends involving some sort of shopping.  And whether we buy anything or not, we always have a blast.  So this weekend was no different.  We shopped, we had fun... and we totally hit the jackpot.

We finally made it to the art supply store we'd been wanting to go to for a while and were pleasantly surprised by their selection.  They had the vast array of traditional media we expected (which got us to talking about doing some painting), but they also had a lot of stuff we didn't expect to find.  A pretty awesome selection of calligraphy supplies, for instance.  Calligraphy and I became close friends when I was about 12, but ours has been a very on again, off again sort of relationship simply because calligraphy supplies are not all that easy to find.  But with this place around...  *insert maniacal laughter here*

So I grabbed a much needed bottle of ink, a really awesome "calligraphy journal" which features some really pretty papers and a very handy guideline page.  No more tedious ruling for me!  Woohoo!  I also grabbed a couple of calligraphy markers for practice and lazy days and quickie projects.  And maybe also nostalgia.  I had a set of these years ago that I used all the time for signing and addressing cards (I was the official family scribe). 

I was almost equally excited by their selection of polymer clay--something else I have previously been unable to find around here.  I mentioned back in my New Year's post that I intended to make some polymer clay jewelry, and now that I know where I can get my clay, that's far more likely to actually happen. 

Now, that would have been enough right there to make my day.  But we weren't done yet.  We also found a new yarn store, where I picked up the set of size 10 DPNs I needed to finish up Kitty's hat and, from the totally-not-yarn-related-but-still-awesome section of the store, a really freakin' cool tea cup from Tea Forte.  We visited a few antique shops along the way, as well, and added to our vintage glove and apron collections.  We even found a nifty stand on which to display some of our gloves.  It's currently sitting on the dresser and it looks smashing.  now, we just need a cool way to display our aprons...

And then we headed to Big Lots.  If you don't have a Big Lots, that's sad.  They sell close-outs and overstocked merchandise, which means a lot of name-brand stuff super cheap.  I recently bought a bunch of Lion Brand and Gala yarns for $1.50 a skein.  In short, Big Lots = Win.  And they certainly didn't disappoint this time.  They didn't have as much yarn as they've had the last few times I've been, but they had oodles of scrapbooking supplies. 

Now, I'm not really into scrapbooking in and of itself, but the supplies excite me because I do love to make things with paper.  And when I saw all those awesome papers and stickers and stamps and doodads and whatzits, all I could think of was books.  Books, books, books!  These would be great for embellishing my books!  So I grabbed a couple of the packages you see in the photo, which consist of several sheets of paper and a whole bunch of assorted... thingies.  And for each of these packages I paid a whopping $2.00.  I love this place.

And as an added bonus, one of their other locations which we visited the other day, had stamps, and I picked up the most adorable set of clear rubber stamps featuring trees and branches and owls.  They match my blog!  How cool is that?  You'll be seeing them in use as soon as I get an acrylic block and some ink. 

So there you have it.  My new toys are my motivation this week.  What's yours?

Thursday, March 18, 2010

Raincheck

Hi, folks.  Sorry about the lack of post yesterday.  I didn't have much time to work, and I decided to focus what time I did have on listing my Coppelia necklace:

Today, I was intending write up a Thursday Threads feature for our featured EtsyBlogger of the month, DizzyDragonflies, but I'm afraid I'm going to have to give you all a raincheck.  My stomach's been vaguely upset all day, and I just don't feel well, so I'm going to just relax and take it easy this afternoon.  See you tomorrow!

Tuesday, March 16, 2010

Techno Tuesday: Greasemonkey/Etsy Hacks

I love Firefox.  I'm a fairly recent convert, and I'm still exploring all the bells and whistles.  But I've already found a number of awesome add-ons that have made my life immensely easier.  I'll be sharing them with you over the next few weeks, beginning with what might just be my favorite, Greasemonkey.

Basically, Greasemonkey allows you to customize a website's appearance.  Once you have the add-on installed, you can download all sorts of scripts for all sorts of sites that do all sorts of things.  That's where Etsyhacks comes in.  Etsyhacks is an awesome collection of Greasemonkey scripts that add all sorts of handy features to your Etsy pages.

I can't comment on all of them, because I don't use them all, but I can tell you that I love the ones I do use.  Here's a look at my favorites...

Fast Tagger 
Fast Tagger does just what it sounds like - makes tagging faster.  MUCH faster.  It gives you one box in which to quickly type all your tags, and with a simple click on the "add to tags" button... BAM!  Your item's tagged. 


Bulk Image Uploader
 I'm sure I'm not the only person who hated having to upload images one at a time.  Well, now you don't have to.  This hack allows you to upload all five of your images in one go.  Quick.  Easy.  Awesome.

Copy Listing


You know what stinks?  When you have a bunch of items that are all the same aside from the color, and you have to fill out a whole separate listing for each one.  Bleh.  Fortunately for us, there's a hack for that.  This particular hack sits quietly on each listing's page just waiting until it's time for you to list something similar.  And when that time comes, one click will copy all of the listing information and plunk it into the forms for you, so all you need to worry about is making those few minor changes.  Simple.

Forum Wrangler


This one's my favorite.  It places a handy dandy little navigation bar at the top of the forum pages, so you can easily bounce around without having to go back to the main forums page.  Even better, it helps you keep track of which threads you've read and which you've posted to, and it gives you the ability to jump right to the last page you read in any given thread, which is great for keeping up with those long, ongoing threads.  No more searching for your last post.  No more trying to remember if you posted to a thread or not.  Now you can do your reading and posting and get outta there and back to creating.

So there you have my favorite hacks.  There are oodles more.  Go check 'em out!  And comment with your favorite Etsyhacks!

Monday, March 15, 2010

Monday Motivator: Goals

Howdy, Folks!  I'm feeling extra motivated this Monday!  It may just be that it's warm and sunny and beautiful today.  But I think part of it is that I've finally set myself a goal.

If you go looking for business advice, chances are this is one of the first things you'll be told.  Set goals.  It's sounds like such a little thing.  And compared to the other things on my to-do list like listing and promoting and organizing, it just seemed so insignificant.  Set a goal?  Pfff.  I've got crocheting to do, ads to make, blog posts to write! 

And aside from that, I honestly just didn't know what sort of goal to set.  Other than "sell something."  But hey, that was a goal, right?  So I let it go at that.

Until a couple weeks ago, when Kitty and I were chatting business and she suggested that I set myself a goal of selling an item a week.  Brilliant!  It was definitely a step up, but still seemed perfectly doable. 

So when Monday rolled around and I got down to business, I decided to make it official.  I registered with Goalforit - which I'd found and bookmarked a few weeks before - so I'd have a way to track my progress and, hopefully, keep myself motivated.

I'll discuss the site further in an upcoming Techno Tuesday, but long story short, it's awesome.  Goalforit allows you to set your own personal goals and (here's the important part) set up an action plan and track your progress.  It's kind of like a to-do list, only better. 

Even though I haven't reached my goal yet, I still feel great because I can see myself making progress.  I know I'm getting closer.  I know I can make it!

Now what about you?  Have you set goals for yourself?  And if so, do you use any sort of system to keep track of your progress?  Leave a comment!