When I started setting up my craft corner, I decided right off the bat that I was going to make organization a priority. Mostly so I could spend less looking for things and more time
making things, but also because I just really enjoy organizing things. Of course, putting everything in its place meant that... well, it needed a place. I bought a couple of little plastic containers at the dollar store, added on to my sophisticated shoebox system, tucked some stuff in the latest box from Amazon... I even borrowed some baking cups from the kitchen to hold my paperclips and pushpins. I'm very fond of repurposing things for storage.
So when we came across a blurb in an issue of Better Homes and Gardens that suggested making magazine holders out of cereal boxes, I knew I was going to have to try it. But whereas they left the boxes undecorated aside from a label on the side, I decided to kick things up a notch and cover mine with wrapping paper.
Here's what I wound up with:
Have I not mentioned my
mild obsession with fondness for Hello Kitty before?
Anyway... This was all well and good for holding my magazines, but what I still had a whole stack of folders full of patterns and tutorials and such. I had some more cereal boxes, but alas, none of them was quite wide enough to accommodate the folders. But we happened to have another box lying around that was just the right size, so I decided to just adapt the method to make a slightly bigger box. And while I was at it, I figured I'd document the process and write up a tutorial for all my dear bloggy friends.
So, enough rambling. Let's get started, shall we?
Here's what you'll need:
- A box of some sort. Doesn't really matter what kind, so long as it's big enough to hold whatever you want to store in it.
- Scissors or utility knife, craft knife, x-acto, etc. I used the utility knife because the cardboard was rather thick. And also, I just suck and scissors.
- Ruler
- Sharpie (or other writing utensil to mark your cutting lines on the box)
- Tape
- Wrapping paper (or whatever you wish to cover your box with; I just used wrapping paper because it was big enough that I could cover the box and only have one visible seam)
Step 1: Remove Flaps
Using your preferred tool, cut the flaps off the top of your box. If you're like me and you can't cut a straight line to save your life, don't worry. Most of this top portion is going to get cut away later anyway.
Step 2: Measure and Mark
Grab your ruler and sharpie and measure up 4.5" from the bottom of your box. Make a mark at this point. Then, measure 3" in from the other side and make a mark at the top of your box. Now connect the dots. This is the line you'll be cutting along later.
But first, to make your life a little easier, flip your box over and repeat this process on the other side. And, if you'd like, draw a line on the end connecting the two bottom points.
Step 3: Cut
Cut along the lines you just marked using whatever tool your prefer. I used my utility knife and ruler to get nice, straight lines, but scissors will get the job done too.
Step 4: Get Wrappin'
If you're familiar with gift wrapping, you can probably figure this out on you're own. But just in case you're not, let's take this step by step...
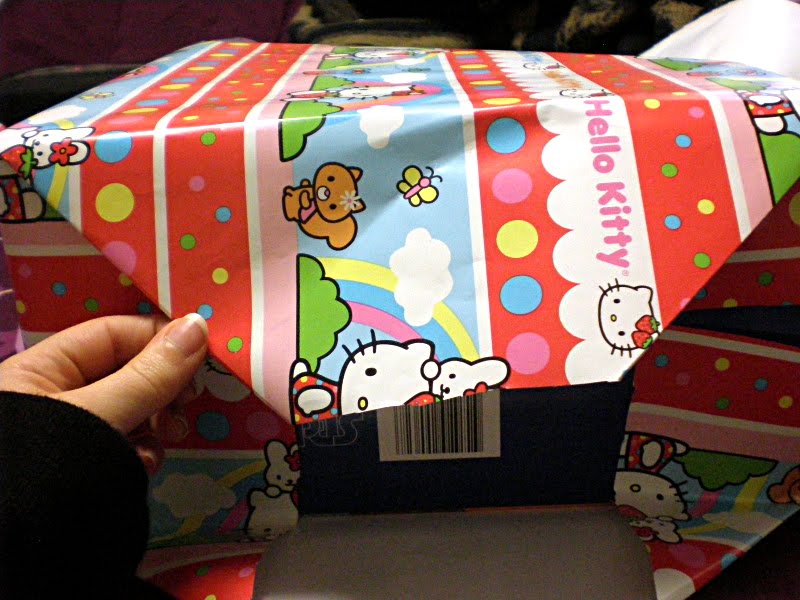
First off, you're going to need a rather large, fairly flat surface. The floor is probably best, but I used the bed because it was there. Roll out your wrapping paper and place your box near the edge. Fold up the edge so that it partly covers the end of the box and tape it in place (I didn't do this, as you can see in the picture above, and I ran into a minor problem later--learn from my mistake).
Now, grab the roll of paper and bring it over the front of the box. You need to get a general idea of where to cut your paper so that you'll have enough for the edges to overlap, so find that point and make a crease (or mark as you please), then cut your paper at that point.
Tape the newly cut edge in place and your box should now have a nice, if somewhat oversized, paper belt. Like so:
If you look closely at the right side, you'll notice there's a gap between the edges. That's the issue I mentioned earlier. I flubbed my guesstimating because I didn't tape the first edge to keep it from shifting. If this happens to you, don't panic. It's a pretty easy fix. But we'll talk about that later. On with the wrapping...
Next we're gonna deal with the bottom. But first thing's first. There is probably way more paper there than you're gonna need, so go ahead and trim it off. Ideally you should have have about 3 inches or so to work with.
Now comes the part that's tricky to explain... You need to push in the sides, so that they're flat against the bottom of the box and a sort of triangular flap is formed, like so:
When you push the sides in, this is the way the paper will naturally want to fold, so just go with it. Crease those folds and smooth things out.
Now repeat the process to form a flap on the top. Like this:
Now that you have your two flaps, you need to tape 'em down. It doesn't really matter which way, but I personally find it easier to tape the bottom flap to the box first, and then folds down the top flap and tape it in place. Either way, you want to make sure to pull the paper tight against the box, so it's wrapped nice and snug.
And... voila!
Again, you'll notice the gap left from my earlier goof. Not a big deal here, obviously, 'cuz it's on the bottom.
Pretty easy, huh? Well, wrapping the rest of the box is even easier. You'll wanna have your scissors handy, because you'll be doing a lot of trimming and cutting.
I started with the short end, but you can start wherever. Basically, all you need to do is trim the section your working with down to a manageable size, locate the nearest corner, and cut straight down until you meet it, so you're left with a flap, like this:
Then just fold down the flap and tape it to the inside of the box. Now work your way around the rest of the box in the same manner--cut straight down at the corners, fold over the flap, tape it to the inside. Simple.
You may notice at the corners, unless you're cutting is totally perfect, that the paper tears just a bit. You can place a small piece of tape at the corners to neaten things up and give them a bit of reinforcement, if you wish, but it's not strictly necessary.
Once you're done with all your cutting and taping, you'll have something like this:
Of course, if you goofed like I did, you're not quite finished. To cover the gap on the end, I just cut a piece of wrapping paper a wee bit bigger than the end and taped it in place...
It's taped on the inside, bottom, and right at the corners, so it's barely even noticeable.
And there you have it! A simple, creative way to put those old boxes to good use and get things organized. I hope you enjoyed this tutorial, and if you have any questions, just leave me a comment. :)


 Posts
Posts


 Image via WikipediaEtsy posted another awesome How-Tuesday tutorial the other day, this one detailing how to make an awesomely comfy looking pair of sandals out of a pair of flip-flop soles and an old t-shirt. How cool is that?