Thursday, December 10, 2009

Thursday Threads: Coats!

I must confess, I am not a fan of winter. I hate cold weather. I loathe it. So when it comes time to buy a new winter coat, it’s very important that it be not only warm, but also awesome. I simply must have a coat that’s cool enough to make me want to wear it. And, because it is a grand repository of cool stuff, I just new there would be some really cool coats on Etsy.

I was right. Check this out:


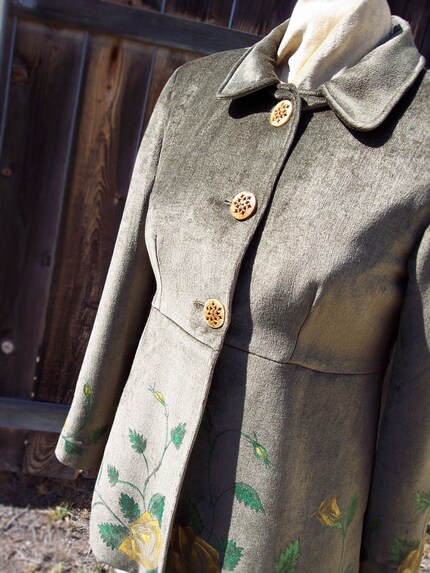
Isn’t it great? It was a beautiful coat to begin with—the cut, the fabric, those buttons… But the painted roses make it truly special. And really, I can think of no better way to ward off the winter chill than by wearing a reminder of the beauty that spring will bring. Relished Artistry has lots of other gorgeous wearable art, so be sure to check out the rest of the shop!

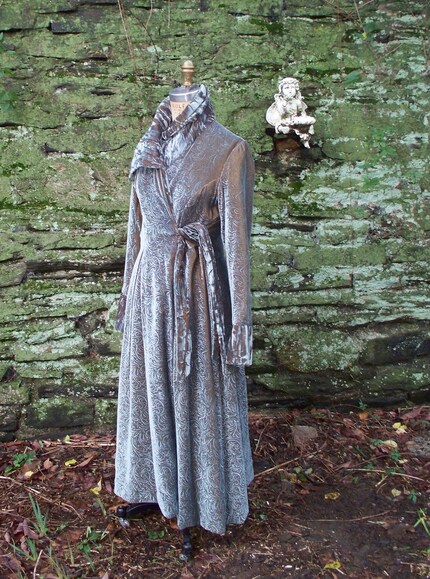
 Finding a good coat one thing. Finding a good coat that won’t look out of place with formal attire is another thing entirely. Granted, it’s not a problem I really have to deal with, but if I did, I’d pick this coat by ShardlowDesigns:


Isn't it just gorgeous?  She has several other beautiful coats in other colors too, so be sure to check out her shop!

If you’re looking for something truly unique, you couldn’t go wrong with one of longing’s designs. I think this one’s my favorite:


Probably because of all the buttons. I’m a sucker for buttons.

Now, do yourself a favor, and go look at the rest of the shop. Everything there is just wonderfully unique.

Me? I’m gonna go have myself a nice cup of hot chocolate and enjoy being indoors! =P

Wednesday, December 9, 2009

Wicked Wednesday: Gothic Christmas Part I

I think I have a new favorite Christmas song. Doesn’t a gothic Christmas sound great? I thought so too. So this week and every week until Christmas, Wicked Wednesday shall feature items that will help you stay in touch with your dark side during this bright time of year, that will bring a hint of dispair to this joyous season and ensure that you have a ghoulishly good Yule.

Looking for something stylish to keep away the chill at your Yule-time festivities? This cloak would certainly do the job and you couldn’t help but look absolutley stunning in it. If Christmas had an official fabric, I think red velvet would have to be it. Or if red’s not your color, MwestDesigns has plenty of other colors and fabrics for you to choose from.

Need something to top off your holiday Lolita (holiloli?) ensemble or maybe a very special gift for someone special (*winkwinknudgenudge*)? Tiny tophats are always a splendid accessory and Olgaitaly has some great ones, including a few just for Christmas. Like this one, featuring gorgeous and glitzy poinsettias.

Or perhaps you’d rather trim the tree than dress yourself. I saw black trees at Walmart the other day, so even you hardcore gloom-and-doom-ists have no excuse not to have one now. And if you’ve got one (even if it’s a colorful, green one) Meatspider has some awesome stuff for you to hang on it. Like Cthulhu.

For the first day of Christmas my true love gave to me…

Cthulhu in my tree.

Brb. Off to go rewrite the rest of the song.

In the meantime, why don’t you show me your gothic Christmas picks!

Monday, December 7, 2009

Monday Motivator: Vintage!

Ah, serendipity…

Kitty and I had dinner with her parents last night. Her mother collects antiques, so after dinner, she was showing us her latest ebay finds. And while we were looking, Kitty suggested she check out Etsy.

“What’s Etsy?” she said. So Kitty showed her my page and some of the vintage items floating around. And the next thing I knew she was handing me a bunch of vintage jewelry she’d gotten at an auction and telling me to take it and see what I could get for it.

So. Though I didn’t really plan to, it looks like I’ll be expanding my shop to include vintage items as well. I’m totally excited. Just need to do some research and see if I can get at least a rough idea of what this stuff is worth…

That’s what’s motivating me this week—great vintage stuff to sell! How about you?That’s what’s motivating me this week—great vintage stuff to sell! How about you? Leave me a comment and tell me what you’re excited about!

Friday, December 4, 2009

Follower Feature Friday: Terrabella

Happy Friday folks! It’s time for another Follower Feature! And another holiday shopping idea…

If you’re shopping for a lady, jewelry is pretty much a no-fail gift. I’m sure there are girls out there who don’t like jewelry, but I don’t know any. Trouble is, some of us like it so much that it’s hard to find something we don’t already have. If you’ve got someone like this on your hands, don’t give up and start looking for other ideas just yet. Go check out Terrabella first.

Your lady/mother/sister/friend may have jewelry consisting of every metal and stone known to man, but does she have anything made of wood? I don’t. Not yet anyway… But I’d love to have any of Terrabella’s jewelry. It’s all just gorgeous, superbly crafted. And no matter how much work is done to a piece, the inherent beauty of the wood itself always shines through.

Take this bracelet, for instance. Or this one. Aren’t they just stunning?

Now. What if you’ve got one of those rare non-jewelry-wearing sorts? Well, Terrabella’s got you covered there too. This keepsake box would make a wonderful gift. Perfect for adding your own personal touch. You could put a hand-written or some other special item in it. Or even use it as a unique, thoughtful way to present another gift. Lots of possibilities, and if this one doesn’t strike your fancy, there are plenty more where that came from.

Like the idea of a useful gift, but looking for something a little… roomier? How about a basket? Baskets are nice, right? How about a hand-woven pine needle basket. I’m willing to bet most people do not already have one of these.

I wish I did. I’d love to see one in person. I’m just fascinated. Must look into this pine needle weaving thing more closely. And while I’m doing that, you go give Terrabella some love!

Want a chance to be featured? Follow me!

Thursday, December 3, 2009

Thursday Threads: Ananya

I love shopping. Especially for clothes. There’s nothing like prancing around your favorite store, grabbing up an armfull of garments, and dancing off to the dressing room to try them on…

But inevitably, this is where the disappointment steps in. There are always things that don’t fit at all or just don’t fit quite right. Sometimes there are things that fit perfectly but the color is all wrong. And then are the things you didn’t bother trying on at all because as much as you loved the design, the fabric was just awful.

Wouldn’t it be great if there was someone in the shop who would take that just-a-bit-too-big dress that you love and make it just your size? Or make that too-short-skirt just a little longer? Or take that cute top in that awful print and making in a fabric you truly love?

Enter Ananya. She makes adorable dresses, skirts, and other garments all in your size and the fabric you choose.

This is the dress that drew me into the store. I knew I’d come across a great designer. But when I saw what else she had to offer, I was really impressed.

There are several things here I’d just love to have. Like this skirt. Isn’t it great? So cute and classy! But I don’t know how I would ever choose a fabric. There are several options shown in the listing itself, but if none of those strike your fancy, you also have the entire stock of two separate shops to choose from. That’s a LOT of options.

And I definitely need this. It’s a cupcake dress, for goodness sake!

What? Doesn’t everyone have a weakness for cupcake-adorned clothing? No? Oh. Well. I do.

I also have a special fondness for skirts and dresses that have pockets. They are a rarity and, in my opinion, pockets are a necessity. I rarely ever put anything besides my hands in them, but I miss them terribly when they’re not there. So of course, I think this dress is fantastic. And it just looks so comfy…

But I think I’ve said enough. You get the point. Go pay Ananya a visit.

Wednesday, December 2, 2009

Wicked Wednesday: Gifts for Goths from Ghost Love

Well, folks. It’s December. If you haven’t started your Christmas shopping yet, now is the time. Don’t let it sneak up on you like I always do! Hop to it! And while you’re at it, stop by my shop. I’ve got some earrings that would make great stocking stuffers. And everything is still 25% OFF through Friday!

Now, as much as I’d like you to buy from my shop, I just might not have what you’re looking for. But I know someone who might. Specifically, if you’re looking for an awesome gift for that sweet, gothic-lolita-steampunk-victorian-enthusiast girl in your life (or guy—don’t wanna be sexist).

Run—don’t walk—to Ghost Love Jewelry, and let the drooling ensue. Honestly, I could hardly tear myself away to come write this. I’ll have one of everything, please!

Or, barring that, here are a few of my favorites…

The Twisted Lickable Lolli necklace is just too cute. And it makes me wonder, if one could find an actual lollipop like this, what flavor would it be?

Ever wondered where you could find a monocle? No? Just me, then? Okay. Well. I have. And now I know. Right here. And isn’t it just gorgeous? Not to mention practical! I definitely need one of these. Are you listening, Santa?

So if you’ve never gone looking for a monocle, then you probably don’t share my fondness for octopi (or octopuses—apparently, both are correct) either. But if you do, Ghost Love’s got you covered there too. Awesomely. As always. (And on a side note, the fact that the octopus necklace closes with a lobster clasp makes me giggle.)

And that’s all I’m going to show you. You need to go look. Now.

Tuesday, December 1, 2009

Tutorial Tuesday: Photo Editing with GIMP

One of the most important aspects—if not the most important aspect—of any listing is the photos. I like to think mine are pretty decent, but I’m certainly no professional photographer. So I’m always on the lookout for any bit of advice that can help me improve my photos.

The Storque, vast repository of useful information that it is, has several great articles about photography floating around in the How-To section. But one topic that seems to get skimmed over a lot in tutorials (sometimes even skipped all together!) is editing your photos.

If you’re not already doing this, you should be. Even if you take fantastic photos, just a bit of editing can make them even better. It’s simple. It’s relatively quick and (usually) entirely painless. And I’m gonna show you how.


“What the heck is GIMP?” you ask. GIMP is a photo editing program much like Photoshop, but with one huge advantage: it’s free. Yup. Completely and utterly free. You don’t ever have to pay one red cent to use it. So go download it.

Got it? Okay. If this is your first time using a program like this, you may be freaking out. There’s a lot of stuff there, and it looks kind of scary. Calm down. We’re only going to need a few of these tools, and they’re simple to use. Just ignore the rest, for now.

Now, then. Once you’ve started GIMP and opened up your photo, things should look a little like this:


(If those little boxes on the right are missing, don’t worry. You won’t need them for the purposes of this tutorial)

Your photo is probably much like this one. It’s not a bad photo. It’s not blurry, it’s not too dark, you didn’t get your finger in the shot… But it’s lacking something. It’s a little dark and the colors just don’t… pop. It needs some pizazz. So let’s get to it!

First thing’s first. Crop that baby! There’s a bunch of background hanging around that we don’t need. We don’t want anything competing with our item for attention. So get rid of it!

How? Head to your tool box (that bunch of little icons there on the left) and select the one that looks like an x-acto knife:


Now position those little crosshairs somewhere around the upper lefthand corner of your image, hold down your left mouse button, and drag the mouse down and to the right. You’ll see a lovely green box pop up to show you what you’ve selected. The unselected portions—the parts we’re getting rid of—will be darker. Like so:


Now when we click outside the box or hit enter… voila!


We’re left with our nicely cropped photo.

Next step: Resize!

Even after you’ve cropped it, chances are your photo is going to be way too big for Etsy (or much of anything else, really). Etsy recommends a width of 1000 pixels, so that’s the size we’ll use.

Side note: If you have trouble getting your photos to load when you’re listing an item, try resizing them down to 800-900 pixels. They’ll still be plenty big, and that slightly smaller size is often enough to get them through.

Resizing is a piece of cake. Just click on “Image” in the menu bar above your photo and select “Scale.” You’ll see a box pop up displaying the current width and height in pixels. Just type 1000 in the “width” box, like so:


When you hit “enter,” the height will change automatically so that your photo’s proportions remain the same. Just be sure that the little chain image shown beside the width and height is linked. If not, click on it. If the chain is broken, only the photo’s width will change, and you’ll wind up with a horrible skewed, wacky looking image.

Don’t freak out if your photo looks tiny now. It’s not actually that small. You just need to zoom in a bit. So head back over to your tool box, select the little magnifying glass, and click on your photo. Now it should be nicely sized to fit your screen, and we can move on to the next step:

Levels!

Levels? Levels basic allow us to control the levels of black and white in our image. Like good laundry detergent, it gets our brights brighter and our darkers darker. Or vice versa.

There are a number of ways you can work with brightness and contrast in your photos, but you’ll get the best results using levels. Here’s how.

In the menu bar above your photo, click on “Colors” and then “Levels.” The box that pops up will look something like this:


That little, black mountain range is called a histogram. It’s basically a graph showing you the amount of black, white, and grays in your image. Yours is obviously going to look different because your photo is different. Mine, as you can see, has a lot of really dark greys and practically no white at all. I need to fix that! And there a couple of ways I can do it.

One way is to grab that little triangle at the right hand (white) side of the graph…


And drag it to the left, until it reaches the edge of the black area:


And here is what you’ll get:


Better already! You can see the white are now actually white, and the whole photo has been brightened up considerably.

Now take a look at the black end of the graph. My black slider is already pretty close to where the black part of the graph begins; yours may not be. If not, go ahead and do the same thing you just did for the white—drag it to the right until it meets the edge of the black area on the graph. Now your black areas should be truly black.

This is usually good enough, but sometimes you’ll get even better results by manually setting the white point and the black point. How do you do that? Simple.

When your “Levels” box opens, click on the little white eyedropper toward the bottom…


And then click on an area in your image that should be white—the brightest, whitest spot you can find. GIMP will correct that spot so that it is really, truly 100 percent white and will adjust the rest of the image to the proper color based on that point. Selecting the black eyedropper and a black area of your image will do the same thing on the other in of the spectrum.

Side note: It’s worth playing around with these methods a bit. Try them both. Try a few different areas when selecting the white point. Just when you think it’s perfect, you may find a setting that’s even better! Just be sure to save a draft or two or at least try and remember what you did so you can get back to that perfect version if you don’t find something better.

Almost finished! We just have one last thing to do--sharpen.

Unless you have really great lighting and tripod and one of those remote clicker thingies and Crazy-Awesome Super-Ninja Photographer Skillz™, you’re photos are never going to be perfectly clear. Oh, they may look pretty crisp, but rare is the photo that couldn’t benefit from a wee bit of sharpening.

So. Assume yours is not that rare photo, and in the menu bar above your photo, click on “Filters,” then “Enhance,” and finally, “Unsharp Mask.”

Not “Sharpen.” It will sharpen your photo, but it doesn’t give you the control that “Unsharp Mask” does.

Here’s what you’ll see:


All Greek, huh? Let me explain.

Unsharp mask works specifically with edges. “Radius” controls how far from the edges the sharpening effect spreads. The farther it spreads, the less noticeable the effect will be, so we want to set this to something pretty small. Generally, I go for about 0.4.

“Amount” is just what it sounds like—basically, the amount of sharpening that gets done to your image. Again, we want to keep this fairly low. Sharpening is a finicky little beast. Be gentle. It’s easy to do too much and wind up with something garish. 1.00 is usually plenty. If you find yourself going way beyond that in attempt to clear things up, then your image is probably just too blurry to start with and your better off retaking it than trying to fix it.

“Threshold” you can generally ignore. The only time it’s really useful is if your image is somewhat grainy. You can sometimes smooth things out a bit, but you’ll want to do so sparingly. Setting the Threshold too high will cancel out the other two setting and you’ll wind up not sharpening anything at all.

So. Long story short…

Radius: 0.4
Amount: 1.00
Threshold: 0

Enter those numbers, click OK, and here’s what you’ll get:


The edges are now much more crisp and clean, the colors are brighter and truer to the actual item, and all of the distracting spaces have been cropped out so the focus is on the item alone. This is an Etsy-worthy photo!  And that's all there is to it.  Piece of cake, right?

Questions? Just leave a comment or drop me a line. Want to know how to do something else with GIMP? Let me know, and it may just be my next tutorial!